Sitemap
Visualize your physical mining infrastructure and monitor performance spatially
Overview
Tables and charts are useful for fleet-wide analysis, but some problems are spatial - a row of miners overheating because of an airflow issue, a rack drawing more power than expected, or a section of the facility with disproportionate error rates. The Sitemap lets you see your facility the way it's physically laid out, with heatmap overlays for temperature, hashrate, and power consumption, so you can spot patterns that would be invisible in tabular data.
The Sitemap is accessible from the Sitemap tab in the Commander navigation.
Understanding the Sitemap
The Sitemap is how you tell Commander where every miner lives in your facility. It mirrors your physical layout — buildings, containers, rows, racks — so you can monitor and manage your fleet spatially, not just as a flat list of IP addresses.
The key idea is simple: everything is a grid, and grids go inside other grids.
The Site grid
Your site is the top-level grid. You define how many columns and rows it has, and then place items into those cells. Items come in two types:
- Groups — organize things together (like a building, container, or room)
- Racks — hold your actual miners
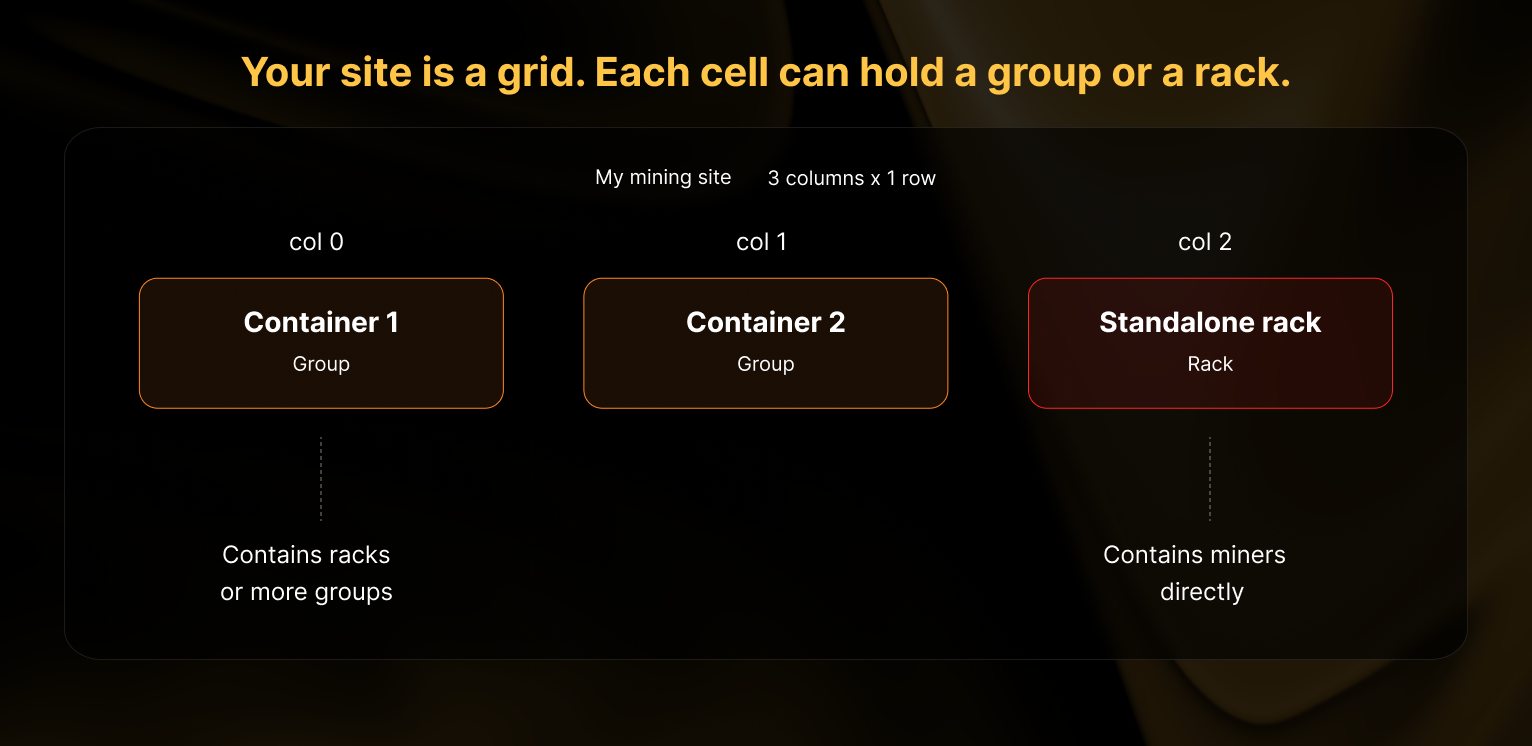
Think of the site grid as a blank table. You choose its size (e.g. 3 columns by 1 row), and then drop groups or racks into whichever cells you want. You don't have to fill every cell.
Groups are grids too
When you create a group, it gets its own grid inside it. You define the number of columns and rows for that group, and then place racks (or more groups) into its cells.
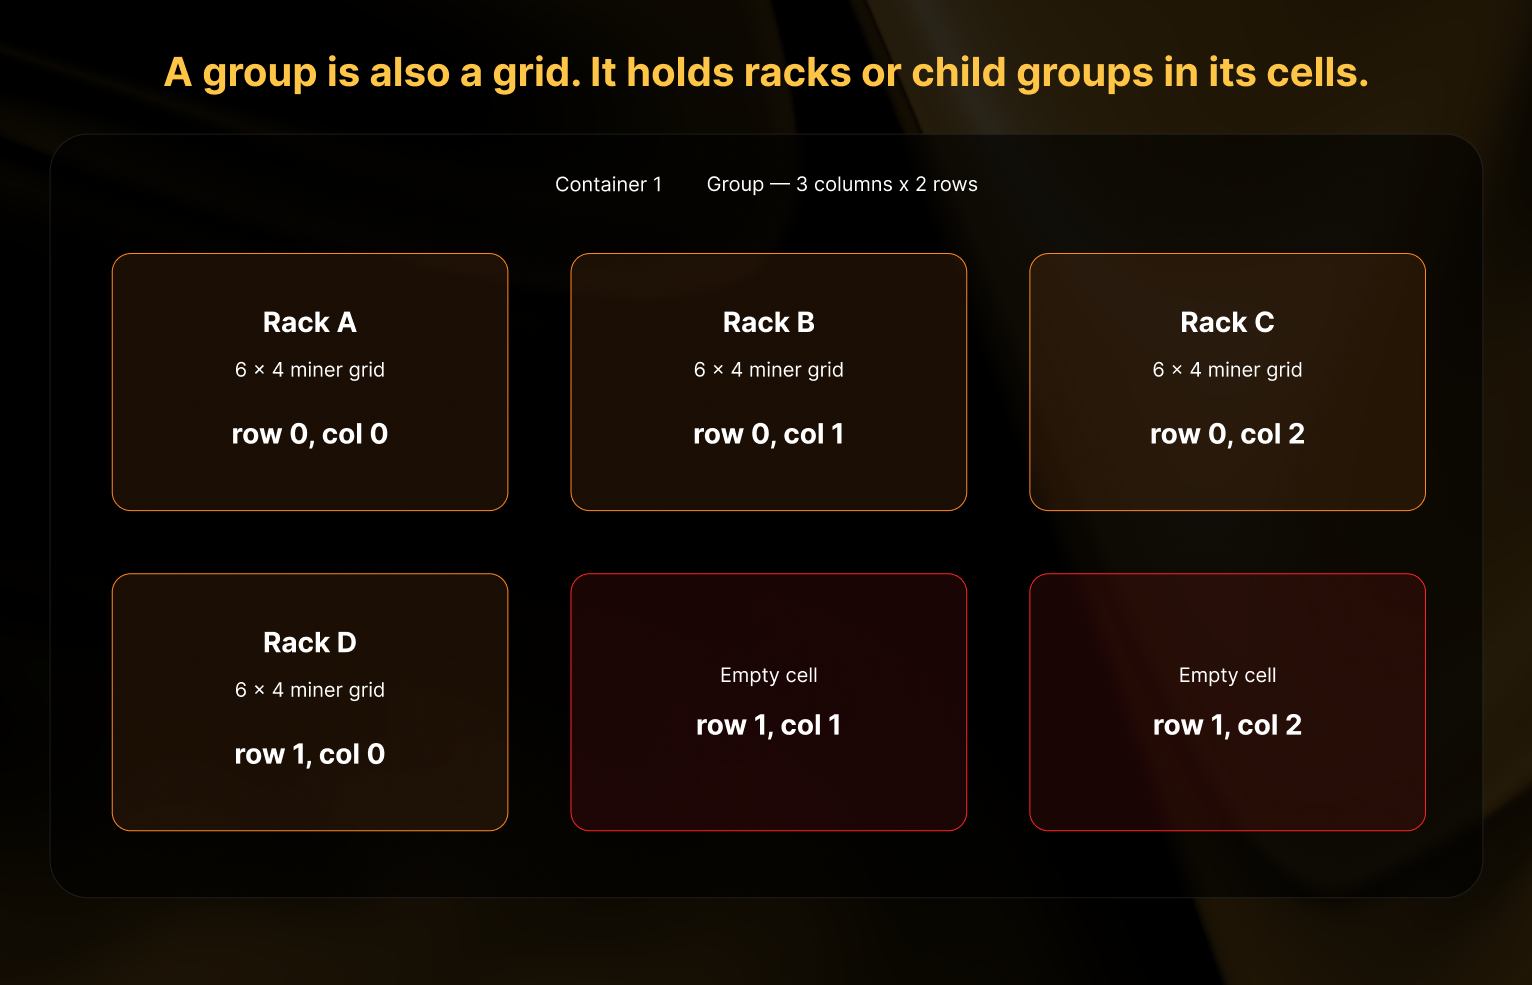
In the example above, "Container 1" is a group with a 3×2 grid. Four of its six cells contain racks, and two cells are left empty. Empty cells are perfectly fine — your grid size just needs to be large enough to hold everything you want to place inside.
Racks are where the miners live
A rack is the final type of grid. Instead of holding other groups or racks, each cell in a rack holds one miner.
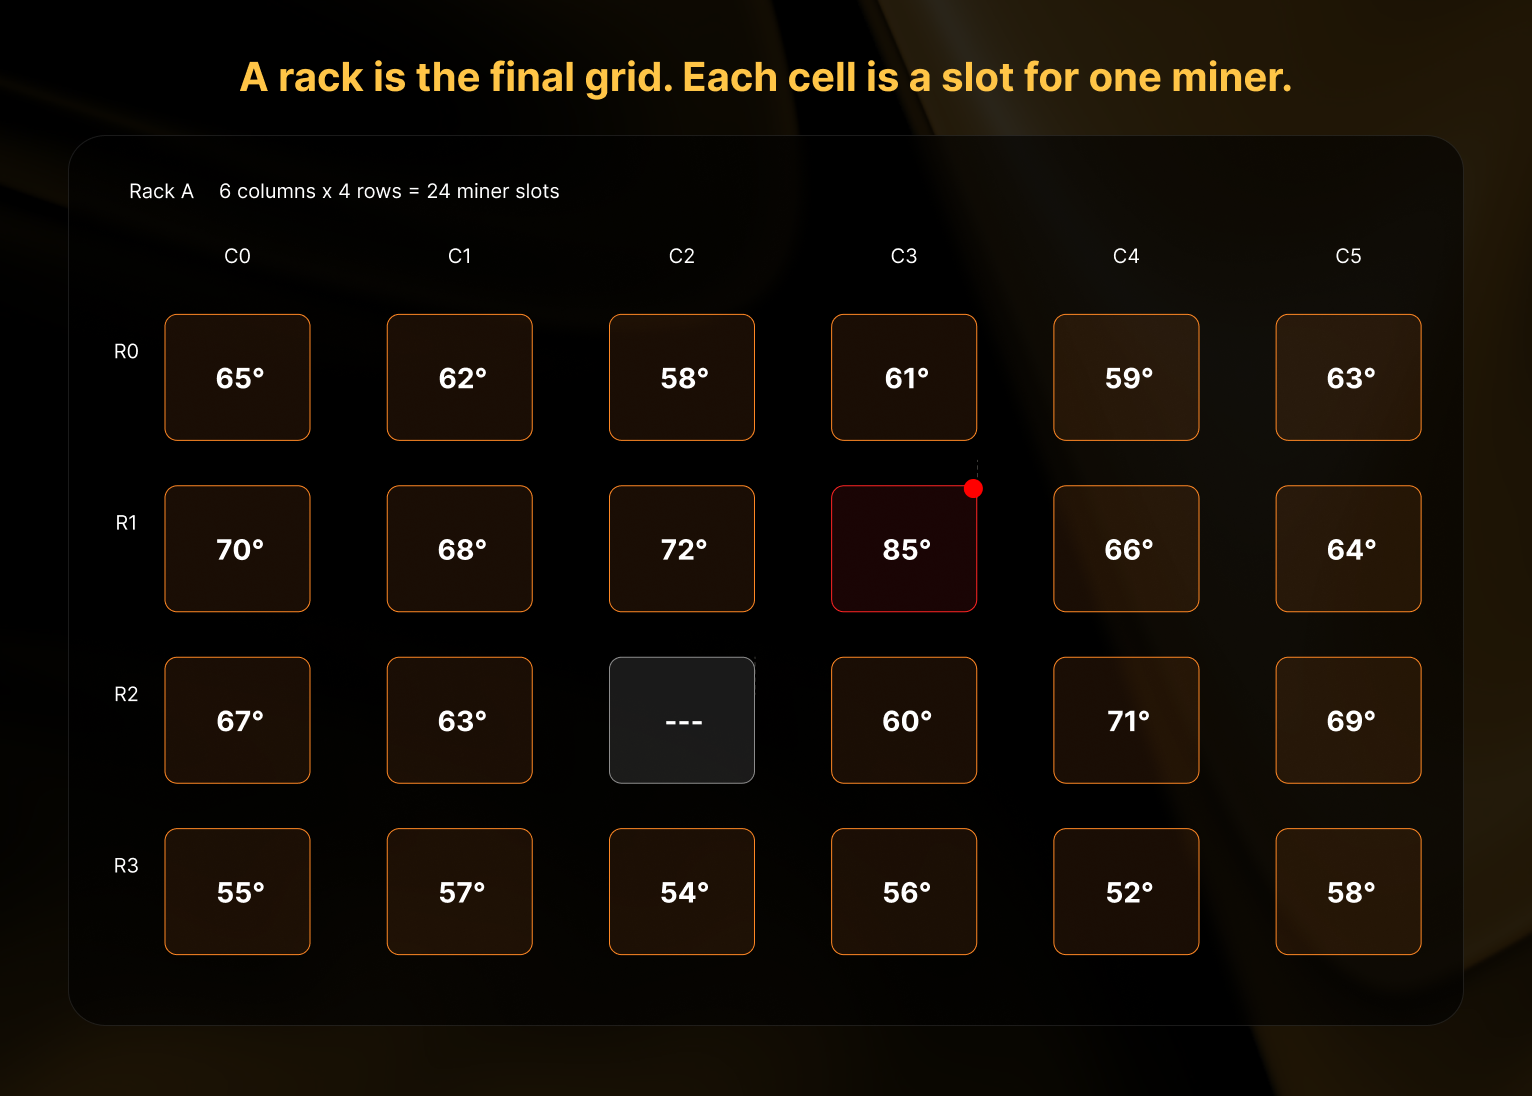
You define a rack's size based on its physical layout. For example, if a rack has 6 shelves with 4 miners per shelf, you'd set it to 4 columns by 6 rows (24 miner slots total). Commander color-codes each cell as a heatmap so you can visually spot issues — a hot miner (shown in orange) stands out immediately, and empty slots are shown with a dashed border.
Putting it all together
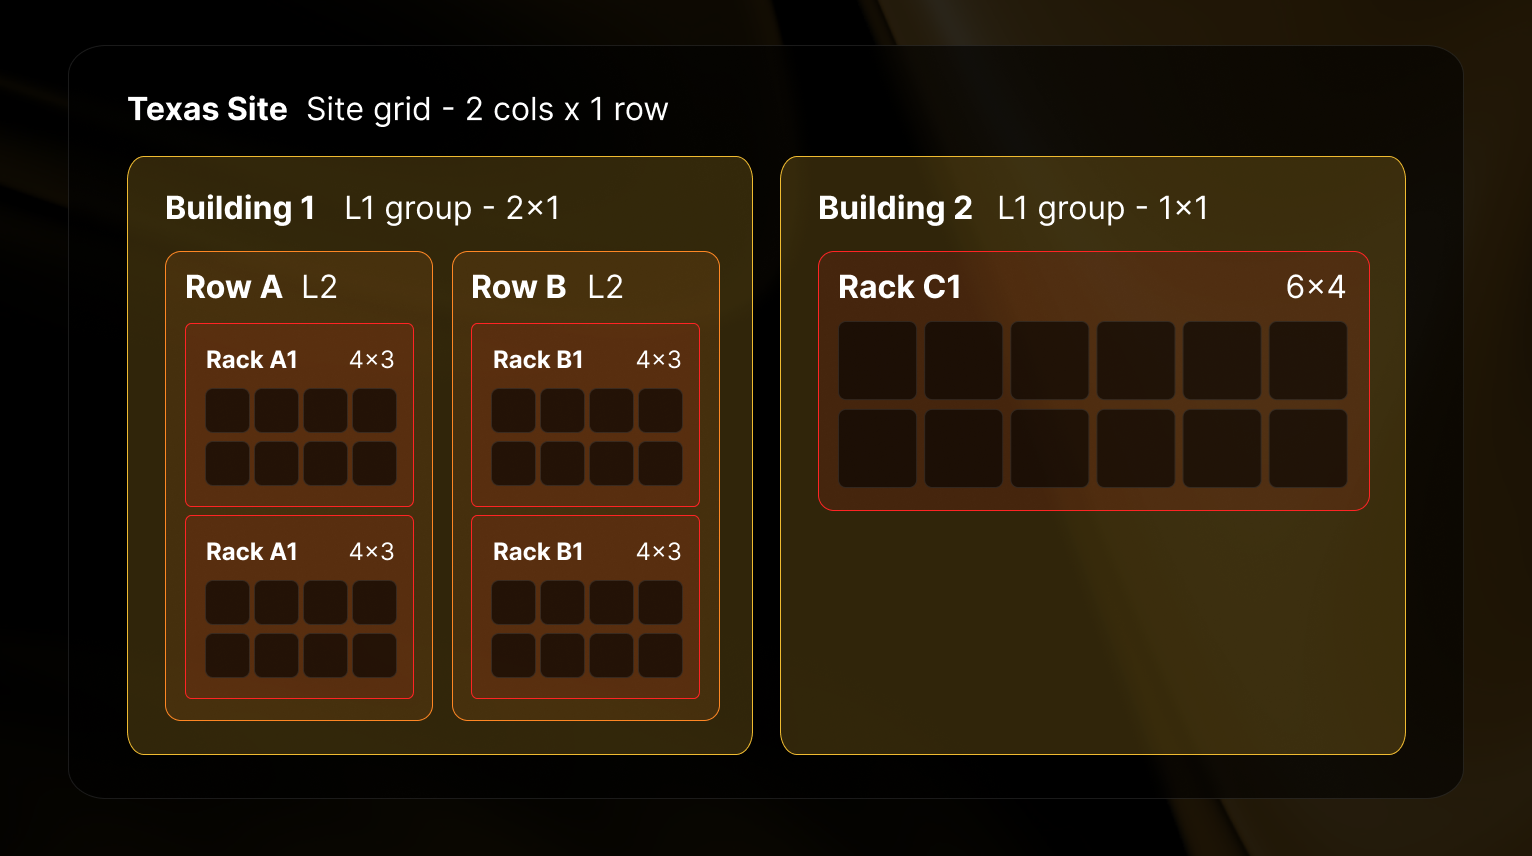
Here's how the three types of grids nest together in a real facility:
Site grid (top level)
├── Building 1 (level 1 group — its own grid)
│   ├── Row A (level 2 group — its own grid)
│   │   ├── Rack A1 (miner grid: 4 cols × 3 rows)
│   │   └── Rack A2 (miner grid: 4 cols × 3 rows)
│   └── Row B (level 2 group — its own grid)
│       ├── Rack B1 (miner grid: 4 cols × 3 rows)
│       └── Rack B2 (miner grid: 4 cols × 3 rows)
└── Building 2 (level 1 group — its own grid)
    └── Rack C1 (miner grid: 6 cols × 4 rows)
Notice how Building 2 has racks placed directly inside it (no level 2 groups needed), while Building 1 uses level 2 groups to add an extra layer of organization. Both patterns work in the same site.
Nesting rules
Groups can hold other groups, but only up to two levels deep. Here's what's allowed and what's not: Two valid patterns:
-
Site → Level 1 group → Level 2 group → Racks — Use this when you need an extra layer of organization. For example: Site → Building → Room → Racks.
-
Site → Level 1 group → Racks — Use this when one layer of grouping is enough. For example: Site → Container → Racks.
You can even mix both patterns in the same site. Some groups might have level 2 sub-groups, while others hold racks directly.
What's not allowed: Three levels of groups (e.g. Building → Floor → Room → Racks). If you need this, combine two levels into one — for example, name your level 2 group "Floor 2 - Room A" instead.
Navigating the Sitemap page
Site-Level KPIs

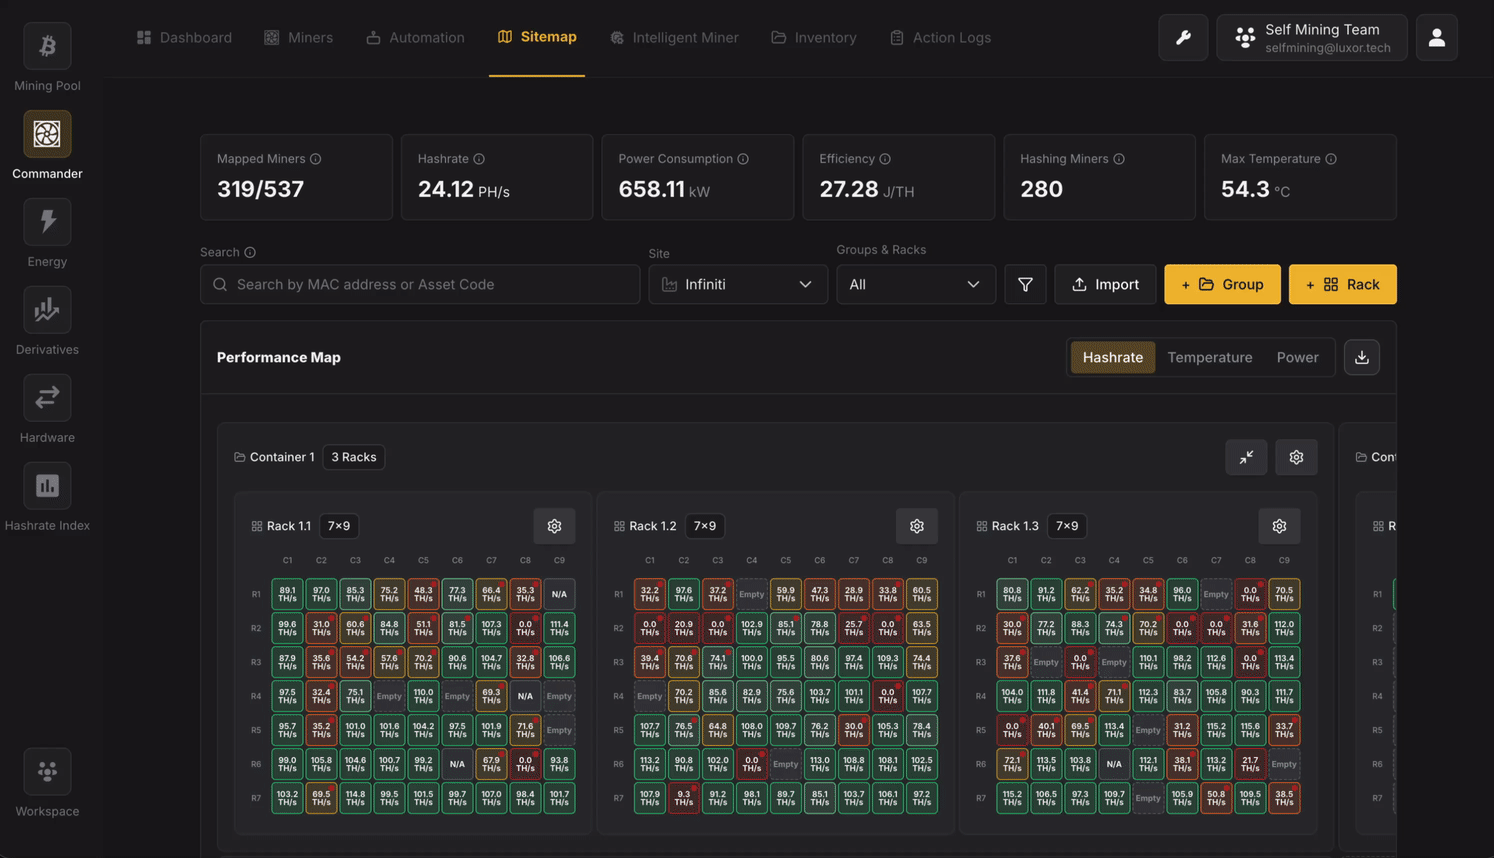
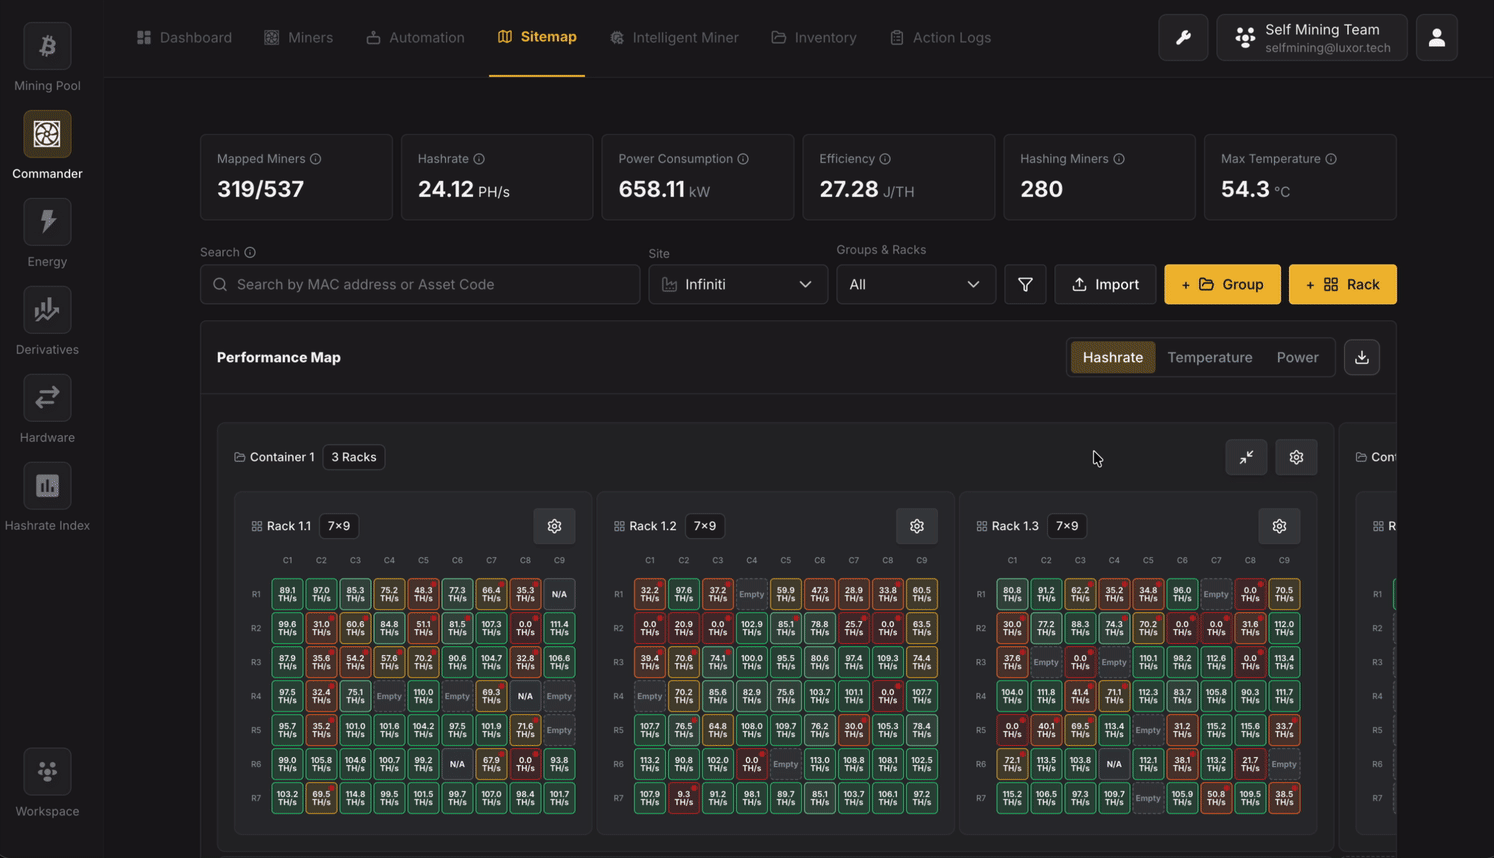
At the top of the Sitemap page, aggregate KPI cards display performance metrics for the selected Site:
- Mapped Miners (Site miners with a Sitemap location associated / Total miners in the Site)
- Site Utilization (online miners / mapped miners — the share of your mapped fleet currently reporting in, whether hashing or idle, versus offline)
- Hashrate (TH/s)
- Power Consumption (MW)
- Efficiency (J/TH)
- Hashing Miners (count)
- Avg Temperature (°C)
All KPIs above are aggregated only for miners from the Site selected which also have been mapped to a position inside the Sitemap. Miners reporting to the Site but not yet placed are still counted in the Mapped Miners denominator, but are excluded from the performance aggregates. When a group or rack filter is active, the KPIs recompute against the filtered selection.
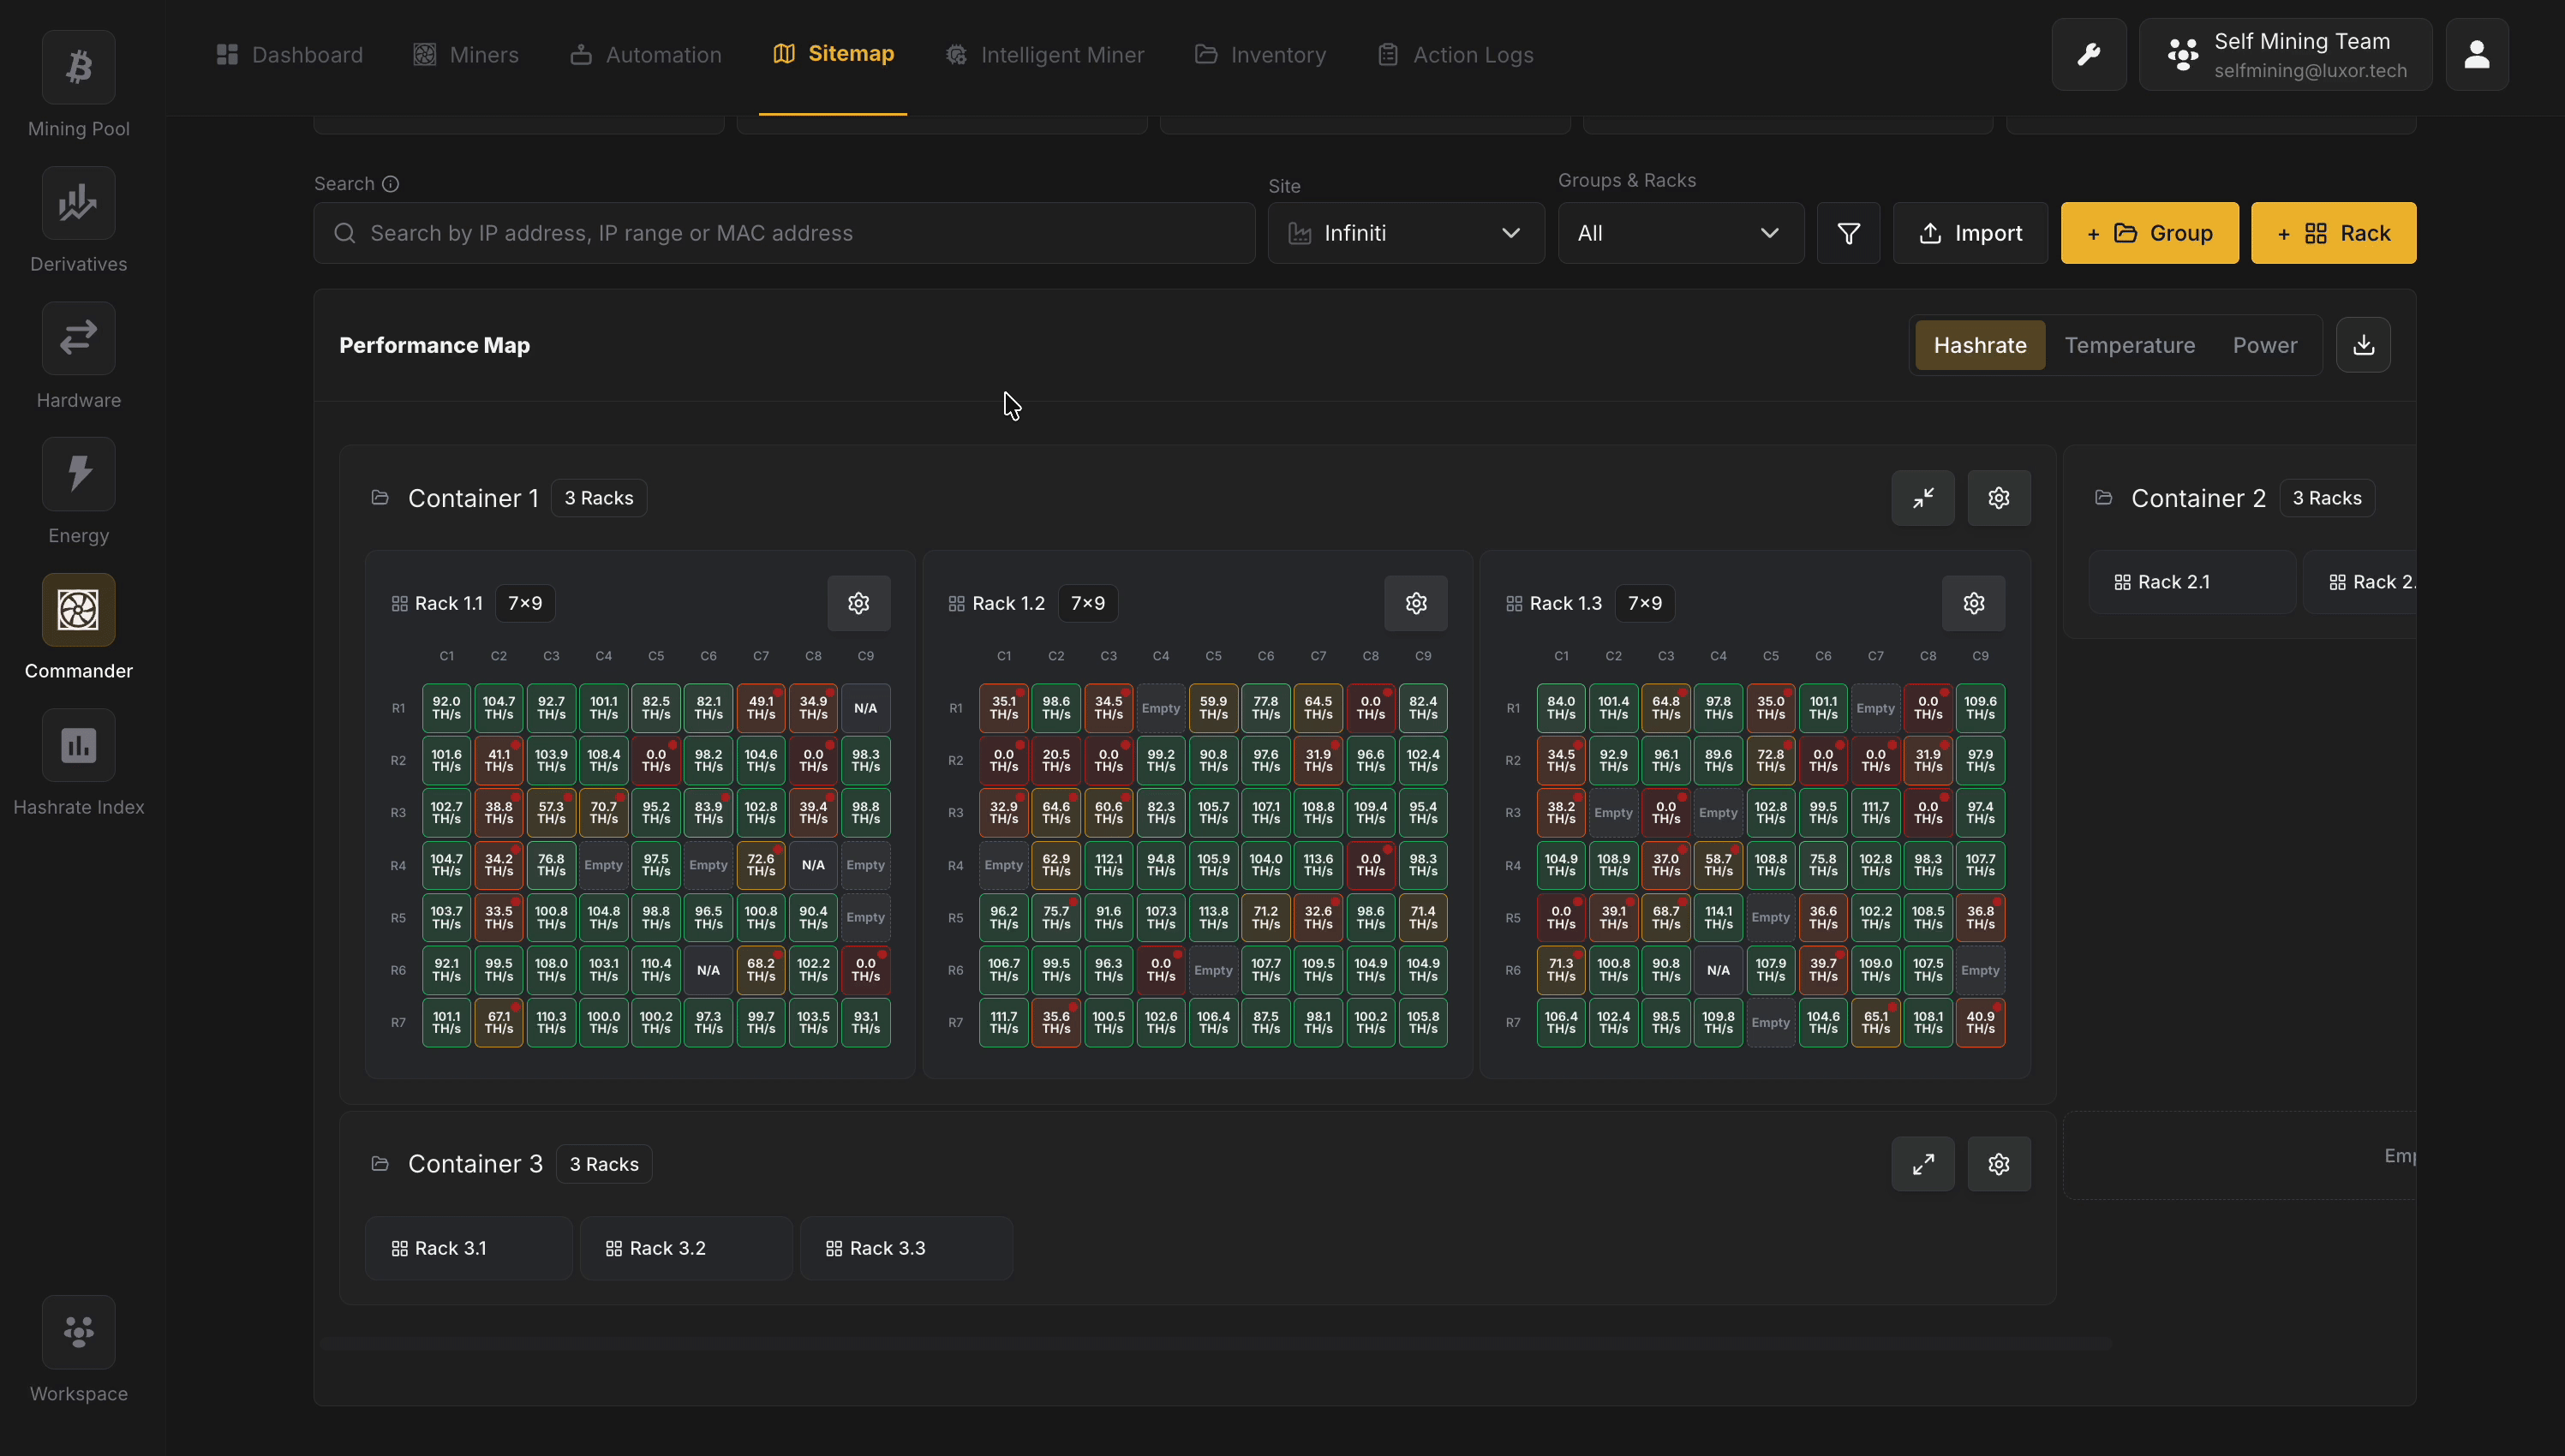
Performance Map
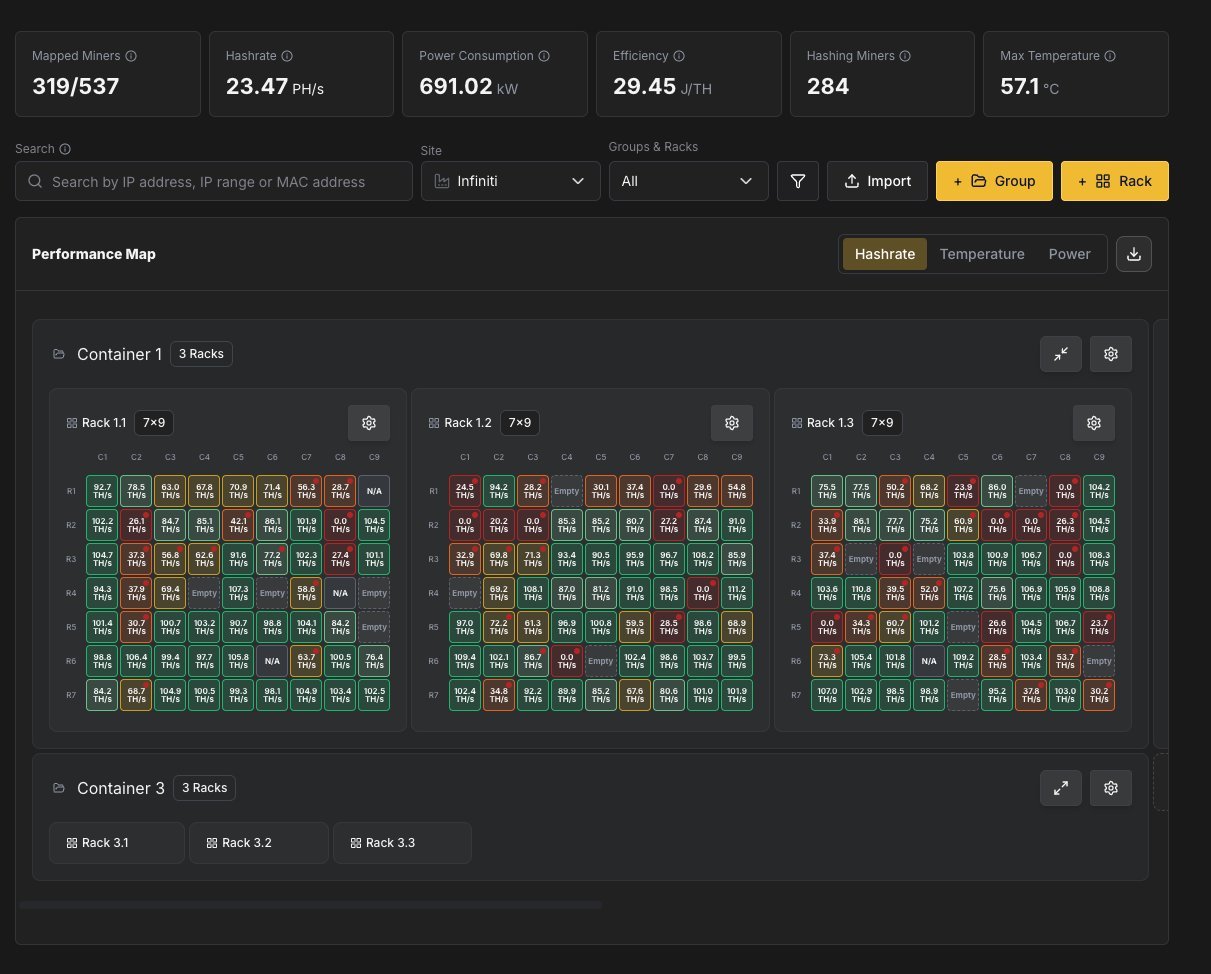
The main area of the Sitemap displays your Groups and Racks with a grid view showing each miner slot. You can switch between three heatmap overlays using the tabs above the grid:
| Overlay | Description |
|---|---|
| Temperature | Color-codes each miner slot based on the miner's avg board temperatures. |
| Hashrate | Color-codes slots based on the miner's current hashrate relative to its expected nameplate output |
| Power Consumption | Color-codes slots based on power draw relative to its expected nameplate consumption |
Each overlay uses a five-level color scale — critical (red), warning (orange), caution (yellow), nominal (green), and excellent (blue) — applied as a halo behind each miner cell, so an out-of-range miner stands out immediately.
Empty slots are displayed as "Empty" in grey, indicating positions where no miner is assigned.
To keep large sites fast to load, every rack renders collapsed by default. Click a rack header to expand its position matrix, or use the Expand All / Collapse All toggle in the toolbar to open every loaded rack at once (a spinner shows while position data streams in). Your expand and collapse state is remembered between visits. A Fullscreen toggle in the toolbar expands the map to the full browser viewport, hiding the surrounding UI to maximize the number of visible racks; press Esc to exit.
Inspecting a Miner
Hover the mouse over any occupied slot in the grid to open a popover with the miner's details, organized into three areas:
- Position header — a colored status circle (reflecting the active heatmap metric, or hashing status), a status icon (hashing, idle, offline, in-repair, disabled, or N/A), and the
R{row} C{column}position label. An In Repair lifecycle badge appears when applicable. - Details — MAC Address, IP Address, health status (Healthy, Warning, or Critical), hashing status (Hashing, Idle, Offline, or N/A), hashrate (in algorithm-aware units), power draw in Watts, and temperature in °C.
- Quick actions:
- View Details — navigate to the full Miner Details page.
- Configure — open the miner configuration dialog.
- Remove — unassign the miner from the position.
- Disable Position — mark the slot as unavailable (see Disabling a Position).
Attention Badges
Rack and group headers display a red attention badge with a warning icon and a count when one or more miners inside need a look. A miner contributes to the count when it falls into the critical (red) band of the active heatmap — abnormally high temperature, abnormally low hashrate, or anomalous power draw — or when it is hashing but reporting a failing health status. Group headers roll up the counts of all racks (including nested groups) beneath them, so you can spot trouble without expanding every rack. The badge disappears once the count returns to zero.
Managing Groups
Adding a Group
Click + Group to create a new group.
The Add Group dialog allows you to configure:
- Identity: Name the group. This is the label you will see on the sitemap for this container (building, row, panel, etc.).
- Group Size: Define the internal grid of this group: how many columns (width) and rows (height) of slots exist for placing child groups or racks inside this group. A small group preview grid updates as you change width and height so you can see the shape of the empty grid (rows × columns).
- Placement: Choose where this group sits in its parent: either the site top-level grid or inside another group. Also set the row and column index of the single cell this group occupies in that parent grid.
Managing Racks
Adding a Rack
Click + Rack to create a new rack.
The Add Rack dialog allows you to configure:
- Identity: Name the rack (e.g. matches your site naming: panel + rack id).
- Rack Size: Define the miner slot grid for this rack: how many columns (rack width) and rows (rack height) of miner positions the rack has. This is not the position of the rack in the facility; it is the size of the rack’s own grid of miners.
- Placement: Choose where the new rack sits in the parent grid (site or group): parent, row, and column.
- Miner Assignment: Optionally map IPs (and discovery) to slots before or after saving. You can skip this and assign later; the section explains that.
- When creating a rack, you need to associate miners with slots. Commander supports two assignment modes:
- Auto-assign: Provide an IP address range (e.g.,
10.206.0.1-100) and Commander will automatically assign miners to rack slots based on their IP addresses.- Allocation Order: Controls how miners are placed into slots when some IPs in the range don't have a miner. Non-sequential (no gaps) compacts miners into consecutive slots with no empty spaces - if your range is
.1-.20and only.1,.3, and.5have miners, they'll appear in slots 1, 2, 3. Sequential preserves positional consistency by leaving gaps for missing IPs - the same three miners would appear at positions 1, 3, and 5, with slots 2 and 4 empty. Use Sequential if slot position should match the last octet of the IP address. - Fill Direction: Choose between "Left to Right, Top to Bottom" or other fill patterns to match your physical wiring layout.
- Allocation Order: Controls how miners are placed into slots when some IPs in the range don't have a miner. Non-sequential (no gaps) compacts miners into consecutive slots with no empty spaces - if your range is
- Manual entry: Manually assign specific IP addresses to individual rack slots.
- Auto-assign: Provide an IP address range (e.g.,
- After configuring the rack layout and IP assignments, click Scan to discover miners at the specified IPs and populate the rack grid.
- When creating a rack, you need to associate miners with slots. Commander supports two assignment modes:
Disabling a Position
Individual rack slots can be disabled to mark them as unavailable without deleting any miner assignment — useful when a slot is physically damaged, under maintenance, or simply should not accept a miner.
- To disable: hover an empty or occupied cell and choose Disable Position. You can attach an optional note (up to 500 characters) explaining why.
- Appearance: disabled cells show a grey "ban" icon and are excluded from miner-assignment interactions. Hovering shows "This position is disabled" along with your note.
- To re-enable: click the disabled cell and choose Enable Position, or Edit Note to update the reason.
Importing via CSV
If you have a large facility or are migrating from another fleet management tool, setting up your sitemap through the UI one rack at a time can be slow. Commander supports CSV import to let you define your entire sitemap structure and miner assignments in bulk.
There are two CSV files, each handling a different part of the setup:
| CSV file | What it does |
|---|---|
| Layout CSV | Defines the sitemap structure — groups, racks, their sizes, and where they sit in the hierarchy |
| Location CSV | Maps individual miners to specific positions inside racks |
You can use them independently. For example, you might import a layout CSV to build the structure, then assign miners through the UI later. Or if your structure already exists, you can import just a location CSV to populate racks with miners.
Both templates are available for download from the Sitemap page by clicking Import. The Download CSV action exports both the Layout and Location CSVs for the current site in a single click, which is handy for backing up or editing an existing layout offline; very large exports are truncated with a warning toast.
Layout CSV
The layout CSV defines every group and rack in your sitemap. Each row is either a group or a rack.
Columns:
| Column | Required | Description |
|---|---|---|
type | Yes | Either group or rack. |
name | Yes | A unique name for this item (e.g., Container 1, Rack 3A). |
rack_width | Racks only | Number of columns in the rack's miner grid (positions per shelf). |
rack_height | Racks only | Number of rows in the rack's miner grid (shelves). |
group_width | Groups only | Number of columns in the group's child grid. Defaults to 1 if omitted. |
group_height | Groups only | Number of rows in the group's child grid. Defaults to 1 if omitted. |
parent_group_name | No | The parent group this item belongs to. Leave empty for top-level items. |
row | Yes | Row position within the parent's grid (0-based). |
column | Yes | Column position within the parent's grid (0-based). |
0-based indexing: The first row is
0, the first column is0. A rack at row 2, column 3 means the third row down and fourth column across.
Example — two containers with racks inside:
type,name,rack_width,rack_height,group_width,group_height,parent_group_name,row,column
group,Container 1,,,3,1,,0,0
group,Container 2,,,2,1,,0,1
rack,Rack 1A,4,6,,,Container 1,0,0
rack,Rack 1B,4,6,,,Container 1,0,1
rack,Rack 1C,4,6,,,Container 1,0,2
rack,Rack 2A,4,6,,,Container 2,0,0
rack,Rack 2B,4,6,,,Container 2,0,1
This creates:
MySite
├── Container 1 (group, 3 columns wide)
│   ├── Rack 1A (4×6 = 24 miner slots) at col 0
│   ├── Rack 1B (4×6 = 24 miner slots) at col 1
│   └── Rack 1C (4×6 = 24 miner slots) at col 2
└── Container 2 (group, 2 columns wide)
    ├── Rack 2A (4×6 = 24 miner slots) at col 0
    └── Rack 2B (4×6 = 24 miner slots) at col 1
Order of rows matters: Groups must appear before the racks or child groups that reference them as parent_group_name. If Rack 1A references Container 1, then the Container 1 row must come first in the file.
Common mistakes:
- Putting two items at the same row and column in the same parent — each cell can only hold one item.
- Setting
rack_width/rack_heighton a group, orgroup_width/group_heighton a rack — these fields apply to their respective types only. - Trying to nest three levels of groups — Commander supports a maximum of two.
Location CSV
The location CSV maps miners to specific positions inside racks. Each row places one miner in one slot.
Columns:
| Column | Required | Description |
|---|---|---|
miner_ip | At least one of miner_ip or mac | The miner's IP address. |
mac | At least one of miner_ip or mac | The miner's MAC address. |
agent_id | When the miner is identified by miner_ip | The Agent that manages the IP. Required when a row specifies a miner by IP address so Commander knows which Agent owns that IP — important when the same IP range is served by more than one Agent. |
row | Yes | Row position within the rack (0-based). |
column | Yes | Column position within the rack (0-based). |
rack_name | Yes | The name of the rack this miner belongs to. Must match a rack name from your sitemap. |
Example — assigning miners to a 4-column, 6-row rack:
miner_ip,mac,agent_id,row,column,rack_name
192.168.1.1,,agent-1,0,0,Rack 1A
192.168.1.2,,agent-1,0,1,Rack 1A
192.168.1.3,,agent-1,0,2,Rack 1A
192.168.1.4,,agent-1,0,3,Rack 1A
192.168.1.5,,agent-1,1,0,Rack 1A
192.168.1.6,,agent-1,1,1,Rack 1A
This places six miners in Rack 1A: four across the first shelf (row 0, columns 0–3) and two on the second shelf (row 1, columns 0–1).
Tips
- You can provide IP address, MAC address, or both. At least one is required so Commander can identify the miner. When you identify a miner by IP address, include the
agent_idof the Agent that manages that IP — rows matched by MAC address don't need it. - The
rack_namemust exactly match a rack that already exists in your sitemap (either created via UI or imported via the layout CSV). - You don't have to fill every slot — empty positions will show as "Empty" in the sitemap grid.
- If a miner is already assigned to a position, importing a new location CSV will overwrite the previous assignment.